With Square Installment payments, now you can!
Las Vegas Glamour Boudoir is excited to announce a new payment plan option available through Square Installments.
Experience a boudoir photo shoot and receive your portraits, then make monthly payments. It's just that easy. Applying only takes a few minutes, but before you do there are a few things you need to know.
0 Comments
Need help finding the best holiday gift for that special guy on your list?We searched the internet and found some amazing gift ideas that you should definitely NOT give him this holiday season. The following ten gifts were listed on Esquire magazines website as the best gifts for men in 2018. However, after reading it you may think otherwise.
If those gifts sound a bit boring you can definitely spice things up and give YOURSELF a gift that HE will LOVE FOREVER! Allow us to create your ultimate holiday gift.  Chanda describes her boudoir photo shoot experience.Following her boudoir photo shoot we asked the lovely Chanda to describe her experience from the beginning. Why she choose Las Vegas Glamour Boudoir, if she had any fears going into her photo shoot, and what she loved most about her photo shoot. We appreciate all of the testimonials from our clients because it allows you the opportunity to hear someone else describe what motivated them to experience a boudoir photo shoot. Although everyone is different, the reasons most women give us are pretty much the same. Why did you choose Las Vegas Glamour Boudoir? -I chose Las Vegas Glamour Boudoir because I feel like this is a good place for me to get what I was looking for. My husband works away from town three weeks a month and I wanted to be able to send him something exciting and fun that he wasn't expecting. 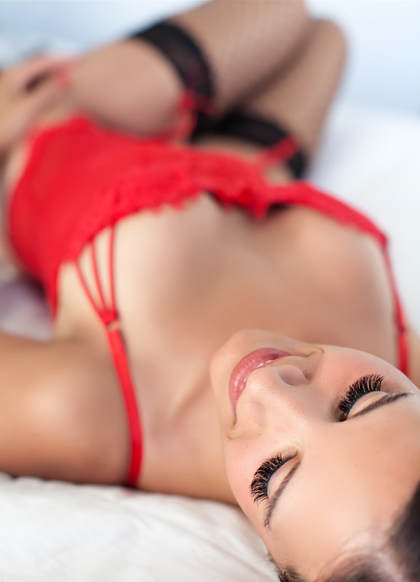 What was your biggest fear before your boudoir photo shoot? Did it come true? And if not, what happened instead? -My biggest fear before my boudoir photo shoot was that I wouldn’t be able to pull it off. Did it come true, no, I was pleasantly surprised. In the beginning I was a little tense but by the end of it we were laughing and having fun and I think I had an overall great experience!  What specifically was your favorite part of your photo shoot and why? -Specifically my most favorite part of the photo shoot was getting to do something for me. I’m a mom of two. Very rarely do I get to feel sexy or focus on me. I’m always chasing kids and cooking meals, so my favorite part is getting to feel special.  If your best friend asked you if they should experience a boudoir photo shoot with Las Vegas Glamour Boudoir what would you say? -I would tell them they need to. I tried to get my best friend to sign up today but she was too shy so I’m excited to go back and show her my photos, tell her she made a big mistake, and get her to book with you.  Why would you recommend Las Vegas Glamour Boudoir to someone else? -I would recommend Las Vegas Glamour Boudoir to any woman or man that wants to feel good about themselves. It's a fun experience and boosts your self confidence. Isn't it about time to fall in love with yourself again? Schedule your boudoir photo shoot today!
We are looking for everyday women for fun and exciting projectsWe are starting a new program that is similar to a model call, however, it is for everyday women! You will get to experience boudoir photo shoots or other fun and exciting photo shoot projects that we are wanting to try out, but can't with or regular clients.  Sure, we could find professional models for this, however, we want to bring out the inner supermodel of real, everyday women. Learn more about Real People Calls going on right now.
The confidence gained by stepping outside of your daily comfort zone.Recently we were fortunate to photograph the lovely Delaney who was in Las Vegas to celebrate her bachelorette party. Delaney always wanted to do a nude photo shoot and thought this would be the perfect time to do it. 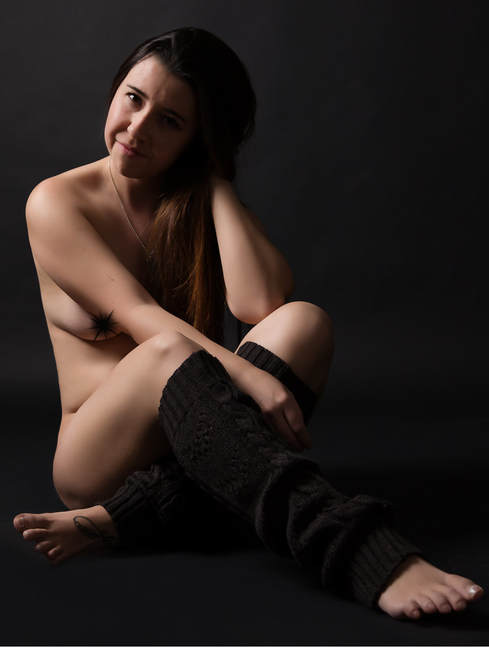 Delaney wanted a fun and sexy photo shoot. She said that she loves the boudoir photography style, but wants to pose nude instead of wearing lingerie. Implied nude photos that show off how your body looks, but without showing EVERYTHING. 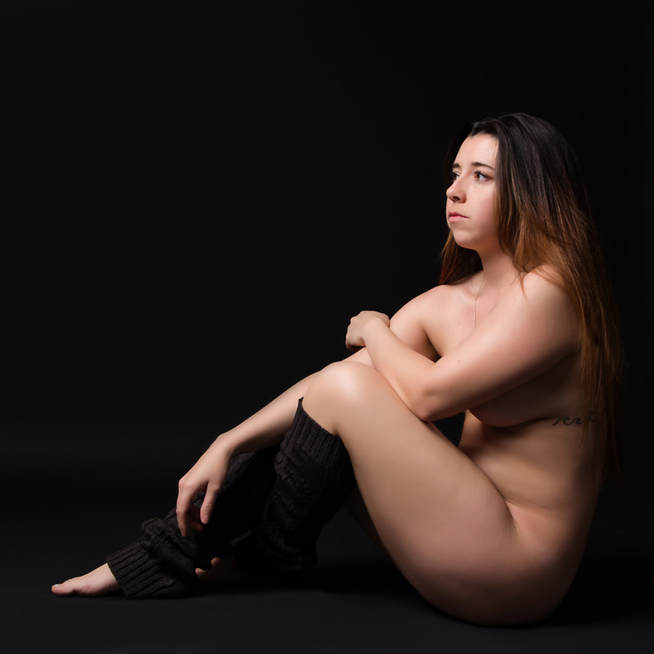 Inside my boudoir photography studio there is a nude portrait hanging on the wall that Delaney loves and she wanted to recreate a look similar to it. The nude portrait came out great and Delaney looks AMAZING!!! 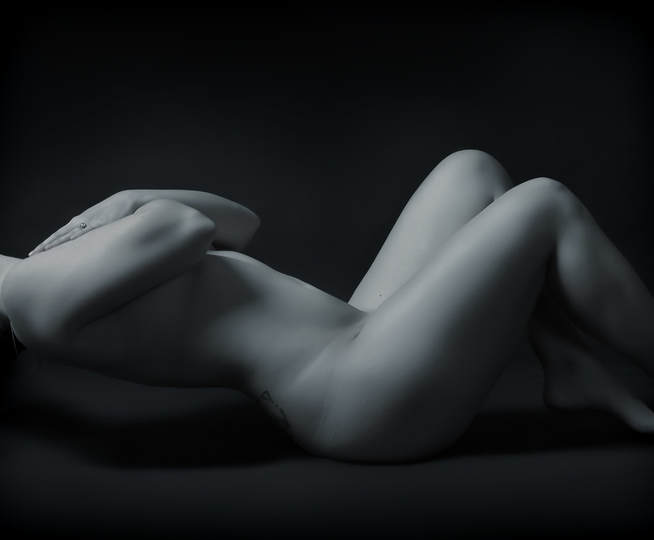 Delaney also brought with her one of her favorite work shirts and wanted to be photographed in it. Sexy does not always mean wearing lingerie. 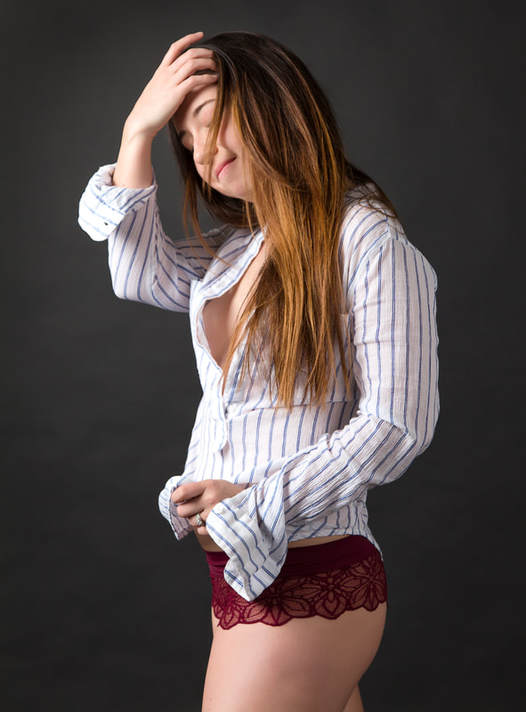 The photo shoot went awesome and Delaney loved her portraits. She was kind enough to to share her experience for everyone.. Why did you choose Las Vegas Glamour Boudoir? - I chose Las Vegas Glamour Boudoir strictly on the experience. I wanted a quick fun shoot! I read the reviews and decided to go for it! What inspired you to do a boudoir photo shoot? - I am not one to pose in lingerie but I did wear some things that I found were sexy but still classy in my mind. Just to have that experience to just rock it and feel the confidence is amazing! 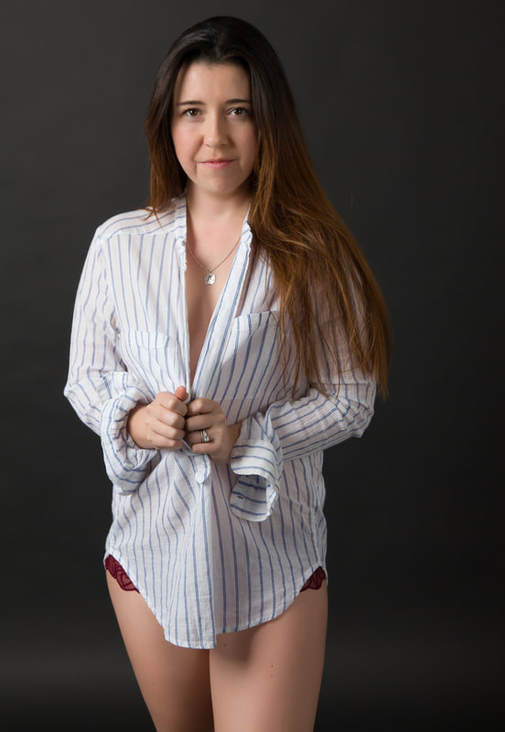 You did a nude photo shoot, how did you feel being naked in front of the camera? - I was nervous being naked in front of the camera but that's the type of limits I like to push for myself. To get out of my comfort zone in that way, I was very excited to experience this feeling. I literally forgot I was naked after a while. Honestly, I feel like I can be naked all the time now and feel completely normal! 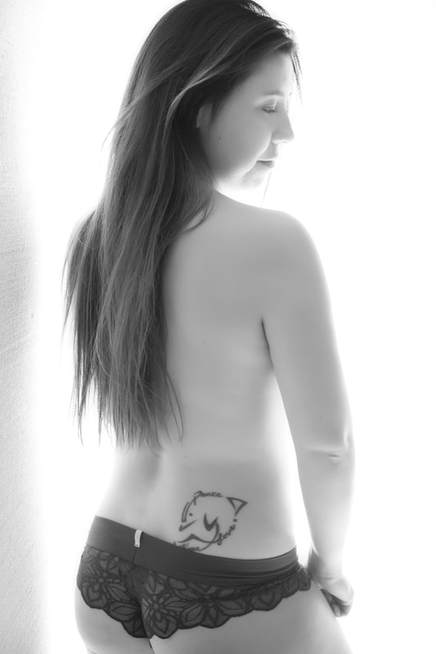 Did you feel uncomfortable being photographed nude by a male photographer? - I thought it would be odd being nude in front of a male photographer but I find it easier to be naked in front of someone I don't know. I felt weird at first but after the photo session, I was completely fine! Bryan was very professional so it wasn't uncomfortable at all to me. 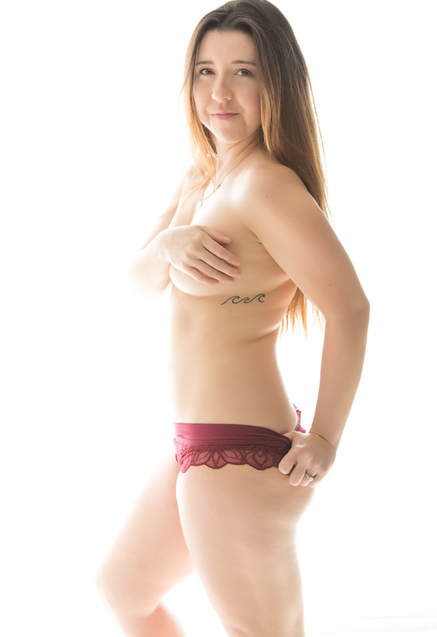 Why should every woman experience a boudoir or nude photo shoot? - Honestly, I feel more confident in my body. I wanted to be nude to capture the beauty of a raw, nude, have it all out there body. Everyones body is so beautiful and I wanted to see that in myself. Every body is beautiful and to find that beauty is what I was after and it was so delicately captured in the photos. I did this photoshoot for myself. I just wanted to do something for me and I enjoyed every moment of it! Thank you Delaney for your kind words. Glad that you had an amazing experience with us and becoming more confident in your body by stepping outside of your comfort zone.
Click on the link to schedule your photo shoot and let your inner confidence glow! Every woman is beautifulAlexandra Raisman, one of the most talented American gymnast and two-time Olympian, recently responded on Twitter about a body-shaming incident when a man actually looked down upon her in a humiliating and rude manner for not finding her according to his so-called ideal gymnast’s body criteria. 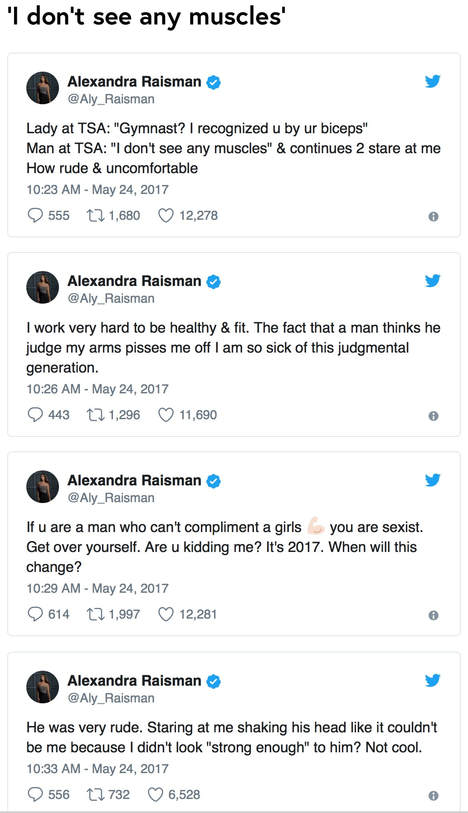 This was probably the last famous incident of such kind by the end of the year 2017 and was responded by Aly Raisman in the most positive and sensible way; ‘...end body shaming…we have to stop putting so much pressure on ourselves and each other!’ she also tweeted ‘I am hopeful that 2018 will be the year that abuse and victim shaming ends. Who’s with me?’ and there was a huge number of people supporting her which proves that the concept of all bodies- big, small, tall, short, light, dark, skinny or curvy are beautiful in their own way, is rising strongly now. Let’s break the notion of a certain number of shape, size, or color is pretty and acceptable. 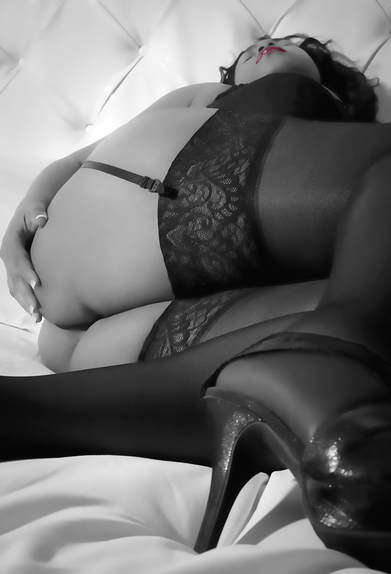 In your life you must have heard and experienced many heart breaking phrases such as ‘That person needs to eat!’, ‘You are way too fat!’, and ‘Real women have curves’; All of these comments and phrases, along with many other with the inherent similar meanings are both prejudiced and limiting.  The rise of the use of social media had increased this craze of comparing one to other and making negative and nasty comments to those who don’t seem to fit in the society’s cliché of beauty. The fashion industry has already realized that the women that wear their fashion clothing and accessories are not all ‘white’ or ‘skinny’ but at the end of 2017 all the major Fashion Weeks and runways are featuring models with diversity, black or brown, plus sized or petite, short or tall, they all look beautiful when they wear their confidence embellished with their prettiest smile and walk on the runway in their favorite outfits. The awareness of converting body-shaming into body acceptance is spreading among all the sensible people around the globe and they are realizing that it’s time to encourage the healthy life style and spread the happiness of positivity instead of clinging to old, dark and possibly unrealistic ideology of beauty. We can claim that the women have entered 2018 with the courage to defy the society’s fake standard of ‘perfect body’ and celebrating the body acceptance in various forms. This is the year of the true women empowerment. Let’s make facts straight here; Real women have curves! NO, some have them, some don’t. Still they are all real and beautiful in their own way. Don’t jump to conclusions however. The girl you called fat could be fighting with a serious health issue. Stop telling plus sized women to cover themselves or not to wear certain garments. The iconic fitness and beauty concepts harped by the beauty and fashion industry are just forcing you to fit into an unreal standards, just to sell their products!  Don’t be fooled, be realistic.
Stop telling skinny women to start eating, as she may be going through some painful phase of her life. Remember, the cruel things other’s say, represent their own misconceptions, fears and prejudices, it has nothing much to do with your body. Ignore the nasty remarks, take a break and LOVE YOURSELF. #STOPBODYSHAMING #LOVEYOURCURVES Some of my favorite boudoir photos are also some of the simplest to createThere is no expensive studio lighting being used and no multiple light set ups. In fact, there is only one light source, the sun. Oddly enough, it is not placed in front of my clients to light their face, but placed behind them or to the side.  You may ask, how does a poorly lit subject become one of your favorite photos? Easily, I use a few dollars worth of accessories and I shoot in manual mode.  Here are the items I use to create my backlit window lit boudoir photos.  First, you need a sunny day, obviously.  Second, you will need a sheer window curtain. It does not have to be anything fancy. The curtain is used to soften the light on your subject.  Third, you need a reflector. Sometimes you can get away without having one on some side lit shots, but for the most part you will want to use one. The reflector will help fill in the shadows on your subject. You can also find a DIY tutorial on how to make a large reflector here, http://www.lasvegasglamourboudoir.com/blog/2012/10/how-to-build-a-large-reflector-for-your-photography-studio 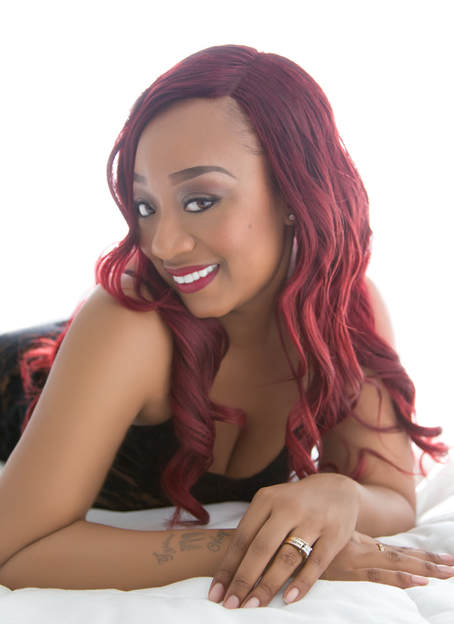 Last, you need to face your fears and place your camera in manual mode. Use a light meter if you have one, or if not, use the cameras built in meter. Take your exposure on your subjects face and expose a couple of stops brighter. There is really no perfect amount, so just play with it until the photo looks good.  Thats all.
Now you can create some amazing looking backlit window light boudoir photos that your clients will LOVE!!! Recently I was blessed with the opportunity to photograph an absolute beauty who traveled to Las Vegas to celebrate her 59th birthdayRose was super cool! She was coming to Las Vegas for her birthday and wanted to do a vintage style glamour photo shoot. We spoke on the phone, sent emails, and text messages sharing different styles and photo ideas. Rose had some great ideas in mind and I loved them all! Rose was an absolute joy to photograph. The entire photo shoot was so much fun! After the shoot, I asked Rose a few questions regarding her glamour photo experience.  What inspired you to do a glamour photo shoot? For years I have always wanted to do a Vintage Glamour Photo Shoot. I've always been inspired by the legendary Hollywood Divas of days gone by, but never really found the right photographer or motivation to follow through. Finally, my husband surprised me and decided to gift me a photo shoot for my birthday in one of my favorite cities, Las Vegas! Do you feel that all women should experience a glamour or boudoir photo shoot. Why? Absolutely! Every woman should experience a photo shoot at least once regardless of age, size, or financial status. There is nothing more empowering than to embrace your inner and outer beauty. All women deserve to feel beautiful and special!  Describe your photo shoot experience. My photo shoot experience was amazing! Bryan made it very easy for me to feel relaxed and comfortable. He allowed me to be myself and just enjoy the process. Bryan is the most patient, friendly, hard-working, talented photographer I have ever experienced. Were you nervous during your photo shoot? I can honestly say that I felt more excited than nervous because it was in Vegas. 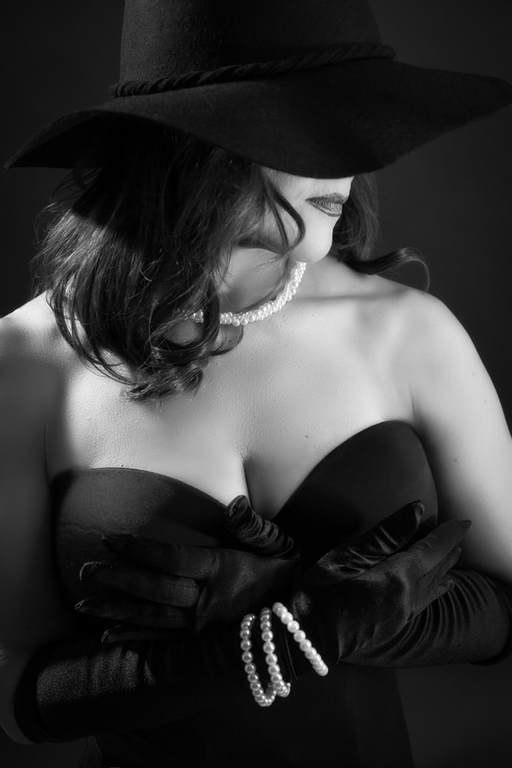 Do you feel there is a difference being photographer by a male photographer vs. a female photographer?
I don't believe it matters whether you are photographed by a female or male, what truly matters is the person behind the lenses and whether they can see the inner beauty of whoever is being photographed. I also feel that beauty is in the eyes of the beholder. Bryan has been very blessed to have this quality. Thank you Rose for the kind words. I had an amazing time working with you! Las Vegas Glamour Boudoir selected as best maternity photographer in Las VegasBragging is not something I like to do very much, but occasionally I just need to toot my own horn. Las Vegas Glamour Boudoir was just selected by Expertise as one of the 17 best maternity photographers in Las Vegas. Expertise reviewed 135 maternity photographers in Las Vegas and scored each on over 25 variables across five categories, analysed the results, and hand-picked a list of the best maternity photographers in Las Vegas, NV.  Expertise based their selection criteria on these 5 key points. 1- Reputation - A history of delighted customers and outstanding service. 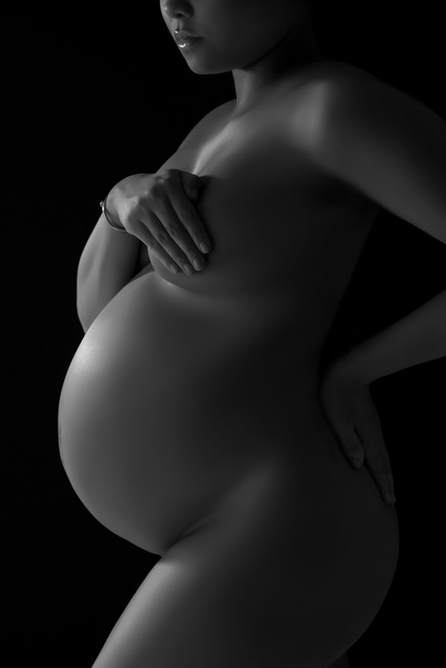 2- Credibility - Building customer confidence with licensing, accreditations, and awards.  3- Experience - Masters of their craft, based on years of practical experience and education. 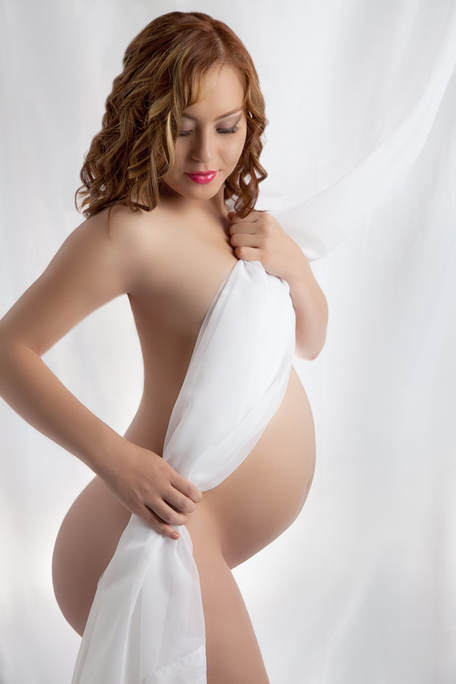 4- Availability - Consistently approachable and responsive, so customers never feel ignored. 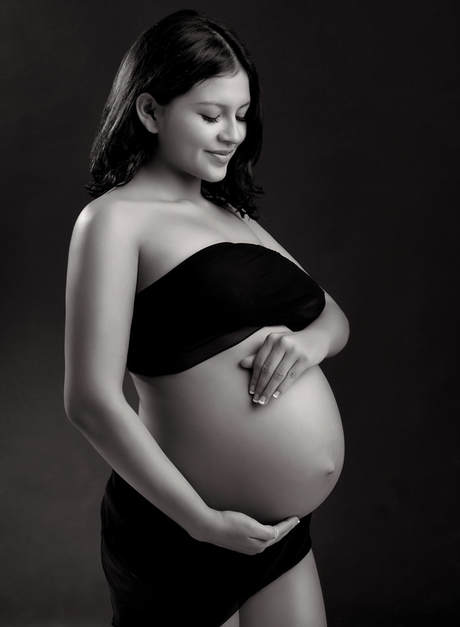 5- Professionalism - Providing service with honesty, reliability, and respect. 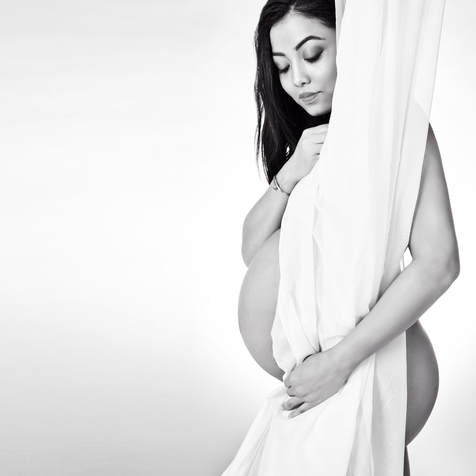 Because I am enjoying this moment of recognition , I would also like to mention the Take Your Best Shot 2014 award I received from Rangefinder magazine in The Ultimate Portrait Photography Competition for maternity photography.  This is the beautiful maternity portrait I submitted. It was selected as a winner and made the top 3. The portrait was printed in the August 2014 Rangefinder magazine and online.  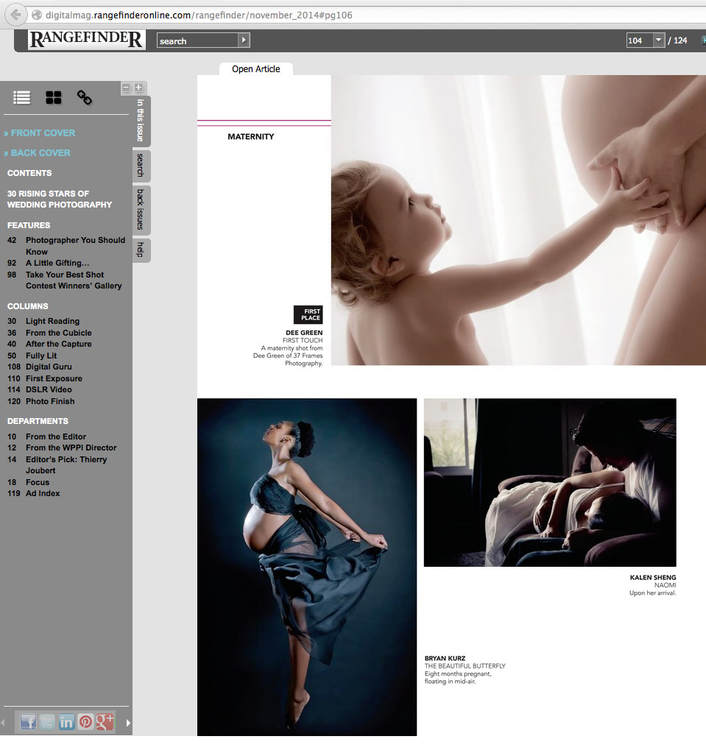 I am very appreciative of these honors and look forward to creating some amazing memories for you.
Creating a realistic looking brick wall using faux brick paneling. Perfect for your home, apartment, or photography studioDo you have a boring wall in you home or studio that could use some excitement? I know I did. This DIY faux brick wall project was easier to do than I expected. Best of all, it only took a few hours to complete. Here is my problem. I have a gray wall located in my photography studio that drives me crazy every time I pass by it. There is really nothing wrong with it, I just felt that it was missing something. It was boring. 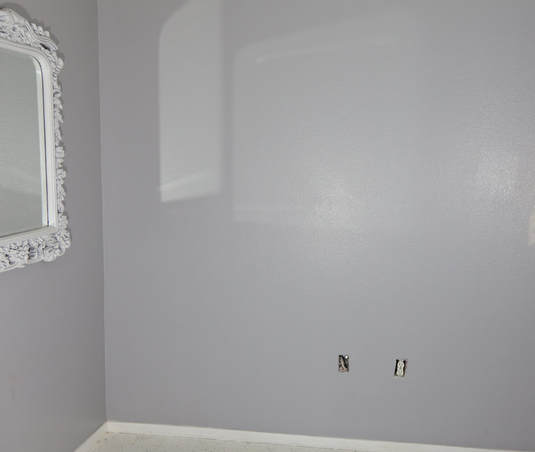 This gray wall has gone through a number of changes throughout the years. I was never satisfied with how it looked.  Until now. Many years ago I thought about creating the look of a brick wall in my studio but could not find the time to do it, the motivation to physically build it, or the best way to accomplish the overall project. I searched online how to create a fake brick wall and got many different solutions. One actually used real bricks. Another suggested cutting pieces of styrofoam into brick size pieces and gluing them to the wall. Some said to dip a rectangle sponge into paint and then stamp a brick pattern on your wall. Although all of the suggested ways to make a faux brick wall would work, there was one major issue that made me not want to do it and that was the thought of how time consuming this project will be. Recently I was at Home Depot shopping for some Wainscot paneling to build a new set for a clawfoot bath tub that I have. Located next to the Wainscot was other paneling that looked like a brick wall. A few months after building my bathtub set, I got started on the new brick wall set for my boudoir studio. I searched online how to make a faux brick wall using paneling. There were many good suggestions on how to do it. Although most suggested a different way to paint their paneling. None of the recommendations really caught my eye, so I decided to do it my own way. I knew when I created my faux brick wall I wanted to do it without spending more money than necessary. And guess what? I did it. The only thing I purchased were two brick wall panels. That is all. Here is what I did to make a faux brick wall without spending a lot of money. 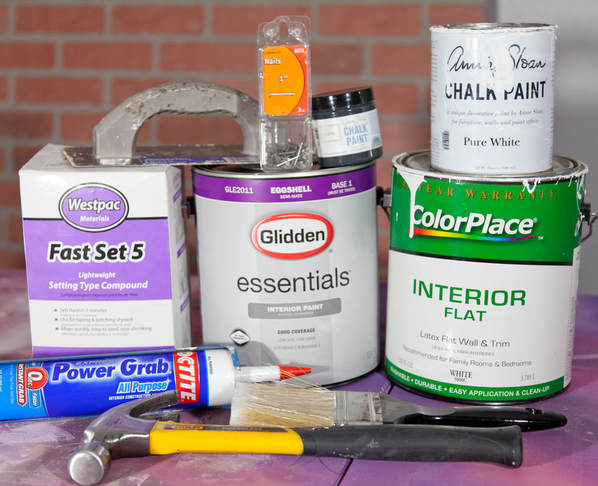 I purchased two brick wall panels from Home Depot. They cost around $28 each for a 8 foot by 4 foot piece. Fortunately, the remainder of items used to create the wall were items I already had from painting and building previous sets for my studio. One item not pictured that you will likely need is a saw. I used a jigsaw. The paneling is not super thick so a sharp utility knife will probably do the trick. You may need to do some more cutting than you expect. I will explain later. My ceilings are about 9 feet high so one panel does not cover the entire wall and leaves a foot of gray wall at the top. I am using this in my boudoir photography studio, so I will simply crop the uncovered gray wall out of the photos when I use it with clients (and for this post). Here is a faux brick panel leaning on my drab gray wall. The panels are kind of on the heavy side (the Home Depot website says they are 32 pounds). The panels are more awkward than they are heavy because they are so tall. I was able to hang the panels up by myself, but it would have been much easier with an extra set of hands. 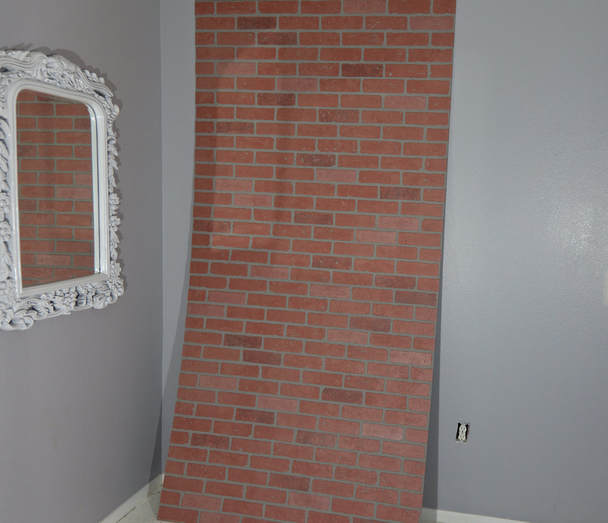 First, I lifted the panel and set it on top of the baseboard then slid it over to meet the edge of the other wall. I did this to see if the panel lined up straight on the wall. Luckily, it did. Next, I laid the panel down on a table and spread adhesive around the edges and center of the brick panel. 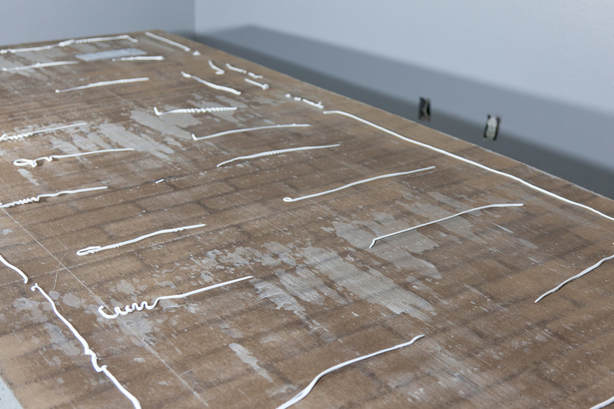 Then, I basically repeated the first step. I slid the panel to its proper position and then pressed all over to give it firm stick. After that, I hammered nails randomly into the panel to make sure it that it will not fall off the wall in case the adhesive fails. 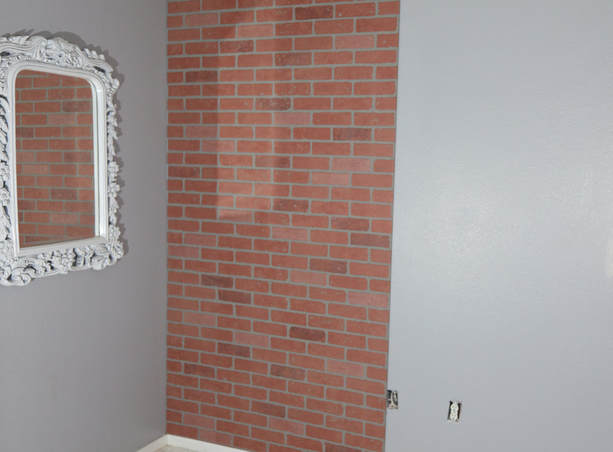 Now the fun part. I am joking. This part was a pain in the ass, but only a small pain. As you can see in the above photo, I have a cable outlet and a power outlet. I do not watch cable television at my studio, so that outlet was covered up. I repeated step one again with the second panel. I wanted to see if the brick pattern matched up perfectly with the panel on the wall. Unfortunately, the pattern was off by a quarter of an inch, so here is were the more cutting part comes. I used a jigsaw to cut off a quarter inch from the bottom to make the brick pattern match perfectly. Then I needed to measure where the power outlet would be and cut a hole out for it. After all the cutting was done, I laid the second brick panel down, spread adhesive on it, stuck it to the wall, pressed and nailed it just like the first one. 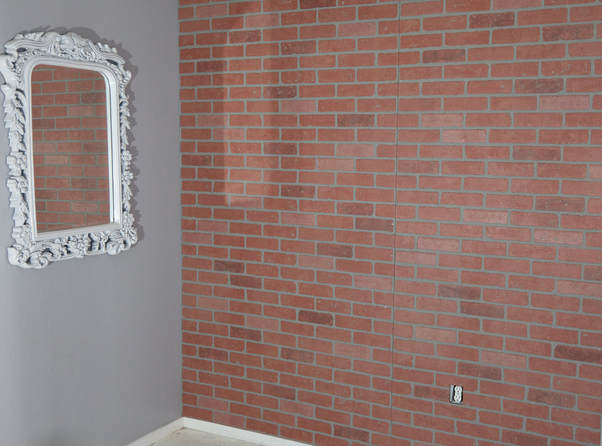 I was surprised how fast things were coming along. Once the faux brick panels were mounted to the wall, I mixed up some drywall patching compound and filled in the excess hole area near the power outlet that was cut out. I also applied the compound in the center where the two panels meet, and over most of the wall to give the bricks a textured look. 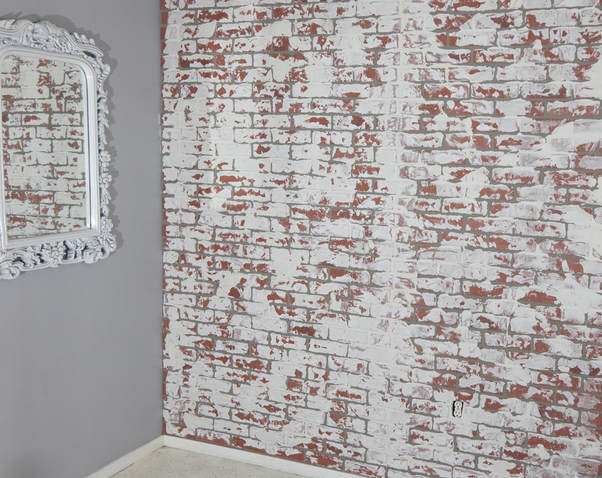 During the time that the patching compound was drying (I had a fan blowing on the wall so it dried fast), I grabbed a paint brush and the charcoal colored chalk paint. I wanted to have some dark accent marks on the wall, so I randomly painted a few. 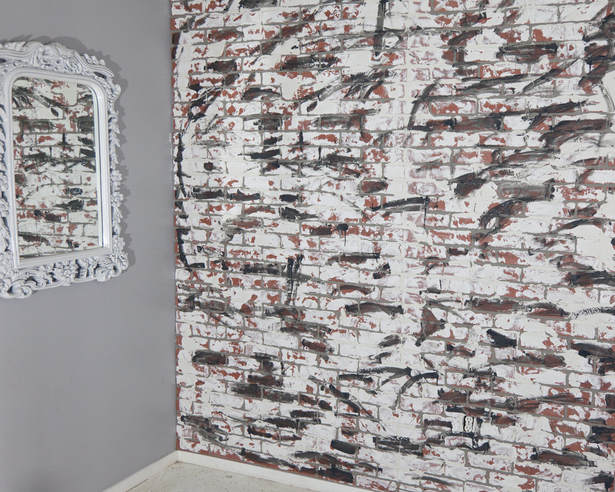 While the charcoal color dried (again, very fast), I watered down a very light gray colored latex paint then randomly brush stroked the paint on the brick panels. This color filled in many of the unpainted areas, as wall as lighten up the dark accent marks. 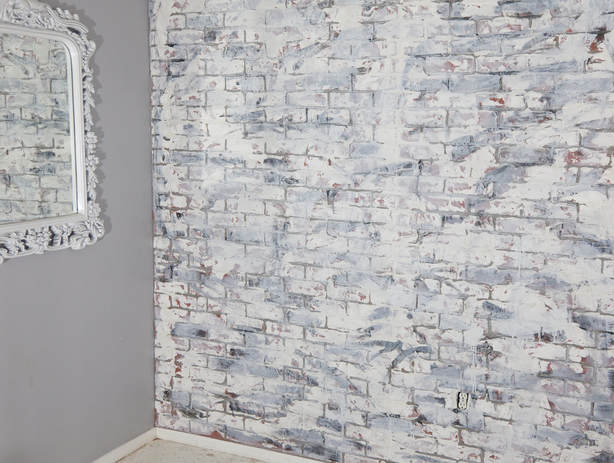 Next, I watered down the white latex paint and painted over the majority of the brick wall. This mixture was about 50% paint to 50% water. Since this paint mixture was very thin, it allowed some of the paint below to show through. Finally, I added some random brush strokes with the pure white chalk paint. I did not notice at the time, maybe because the paint fumes were getting to me, that I did not like how the white chalk paint looked. The brush strokes were very bright. 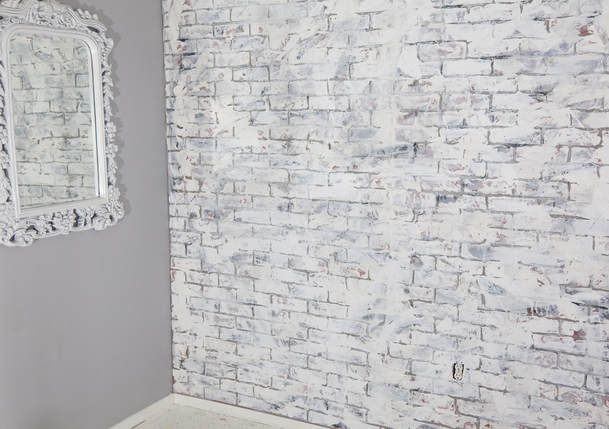 This project was so easy and quick. It took me more time to write this blog post than it did to get the brick wall done. 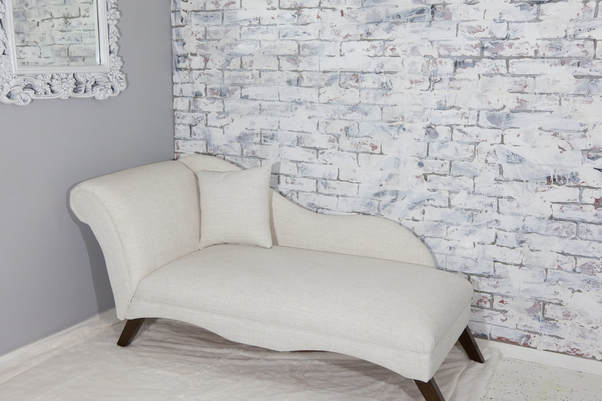 I have to say, I absolutely love how my faux brick wall looks. Most important, my clients love taking photos in front of it.  I have since rubbed the brick panel down with a wet rag to mute the bright spots from the white chalk paint and let some of the red brick color show through. It is looking much better now!
|
|
Email: LasVegasGlamourBoudoir@gmail.com
Call/Text: 702-714-0469 3430 E Tropicana Ave #57 Las Vegas, NV 89121 |